DIY AI bike fit at home: how to dial in your posture for pain-free riding
Tired of knee pain, numb hands, or saddle soreness? Here is how to do a millimeter-accurate AI bike fit at home using your phone and an indoor trainer.
TL;DR: Sore knees or numb hands? Your bike fit is likely off by a few millimeters. You can test your joint angles and get exact adjustment advice at home with Bikerly (100% in-browser, private, and your 1st AI fit is free).
We have all been there. You spend decent money on a gravel rig or road bike, plan an ambitious 50-mile loop across the hills, and by mile 25 your knees are screaming, your lower back feels like concrete, and your fingers have gone completely numb.
The natural instinct is to blame your fitness. Or buy a softer saddle. Or swap bar tape.
Most of the time, the culprit is much simpler: your bike fit is out by a few millimeters.
A millimeter sounds tiny. On a 3-hour ride with 15,000 pedal revolutions, a saddle that is 8mm too low or 10mm too far back forces your joints through thousands of awkward, repetitive angles. That is where chronic aches and wasted watts come from.
For years, the only real fix was booking a professional studio fit. But with studio sessions costing anywhere between £150 and £350, it is a steep ask for everyday riders and weekend bikepackers.
Today, computer vision and client-side AI make it possible to do a precise biomechanical fit at home in under fifteen minutes. Here is how it works, what angles actually matter, and how to dial in your setup yourself.

Why guessing with Allen keys fails
Before computer vision tools came along, DIY bike fitting was mostly guesswork and folklore:
- The "heel on pedal" rule for saddle height (which completely ignores ankle flex and crank length).
- The plumb line from the kneecap (KOPS), which shifts depending on whether your pelvis is rolled forward.
- Eyeballing handlebar reach in a hallway mirror while trying not to fall over.
The problem with static checks is that your body moves differently under actual pedaling load. You need dynamic motion capture to see how your hips rock, how your ankles articulate at the bottom of the stroke, and how your shoulders drop when you are cruising.
How AI bike fitting works
Modern AI fitting uses pose-estimation neural networks. When you record a short 10–15 second side-on video of yourself pedaling, the computer vision model:
- Identifies 33 skeletal body landmarks (ankles, knee pivots, hip joints, shoulders, wrists).
- Tracks every landmark dynamically across multiple full pedal rotations.
- Automatically isolates keyframes in the stroke — Bottom Dead Center (BDC at 6 o'clock) and Top Dead Center (TDC at 12 o'clock).
- Compares your joint angles against sports-science ranges for your riding discipline (Gravel, Road, MTB, or Triathlon).
- Calculates specific millimeter adjustments for saddle height, saddle fore/aft, handlebar stack spacers, and stem reach.
How to set up your at-home AI fit session
Getting clean data from AI fitting depends on setting up your camera properly. You do not need professional lighting or tripods — just a smartphone and a bit of floor space.
1. The setup checklist
- Bike support: Put your bike on a stationary turbo trainer or rollers. If you do not have a trainer, balance between two sturdy chairs or have someone hold the bars while you pedal smoothly backwards.
- Camera placement: Position your phone roughly 2.5 to 3 meters away, directly level with your bike's bottom bracket or crank center. Keep the camera completely parallel to the bike (no tilted angles).
- Clothing: Wear fitted cycling shorts or bibs. Baggy cargo shorts obscure your hip and knee markers.
- Lighting: Make sure there is decent contrast between you and the background wall. Avoid filming directly into a bright open window.
2. Record 15 seconds of steady pedaling
Hop on the bike, spin up to a natural cadence (around 80–90 RPM) with moderate resistance, and record 10 to 15 seconds from the side.
The critical angles that dictate comfort
When looking at your AI fit breakdown, these are the key biomechanical numbers that matter most:
1. Knee extension at bottom dead center (6 o'clock)
This is the golden metric for saddle height. Measured between your hip, knee, and ankle at the bottom of the stroke.
- Target range: Typically 140° to 150° for endurance/gravel riding.
- If angle is under 138° (Too Low): Puts excessive pressure on the patella tendon. Classic symptom is aching pain at the front of the knee.
- If angle is over 152° (Too High): Forces your leg to hyper-extend and causes pelvic rocking. Symptoms include pain behind the knee (hamstring tendon) and saddle sores.
2. Knee angle at top dead center (12 o'clock)
Measured when the pedal is at the very top of the rotation.
- Target range: Usually above 65° to 70°.
- If the angle is too acute: Your knee is compressed too close to your chest, causing anterior hip pinch and lower back strain. Often fixed by adjusting saddle setback, raising the saddle slightly, or trying shorter crank arms (e.g., 165mm vs 175mm).
3. Shoulder and elbow angle (cockpit reach)
- Target shoulder angle: 85° to 90° relative to your torso.
- If reach is too long: Causes neck stiffness, shoulder pinching, and numb fingers from bracing too much body weight on the hoods.
- The fix: Swapping to a 10mm shorter stem or removing headset spacers to find a relaxed elbow bend.
Testing your posture in your browser with Bikerly
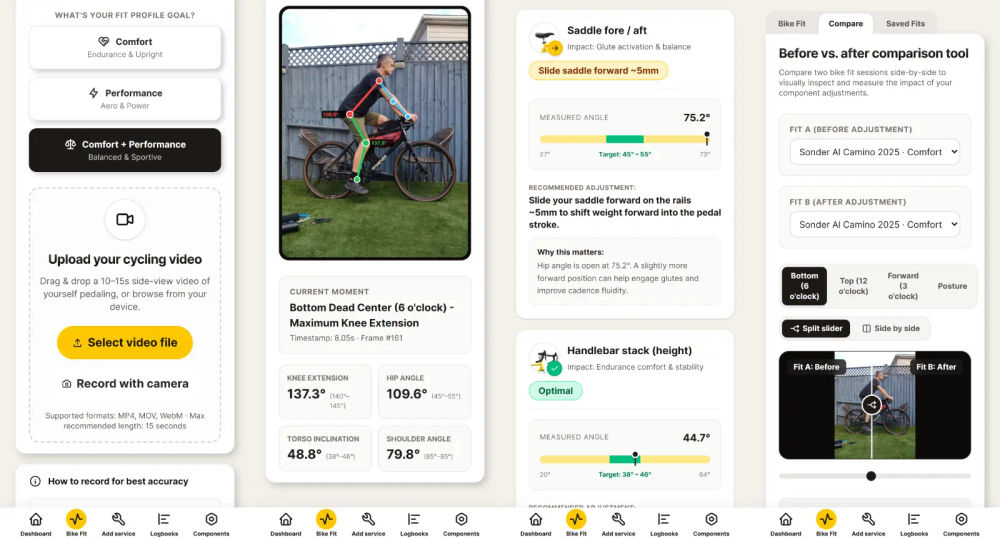
I built Bikerly to make this entire process private, instant, and accessible right from your web browser without downloading heavy apps or paying for studio visits.


Why Bikerly is different
- 100% In-Browser Privacy: Unlike other AI fitting platforms that upload your video files to third-party cloud servers, Bikerly runs computer vision locally on your device. Your video is never uploaded anywhere.
- 1 Free AI Fit Session: Every free account includes a full AI Bike Fit analysis so you can check your joint angles and comfort scores immediately.
- Millimeter-Exact Prescriptions: Upgrading to Bikerly Pro (£11.90 single 1-Year Pass, no auto-renewing subscriptions) gives you exact millimeter adjustment directions for your saddle, stack, and stem reach, plus an interactive Before & After split comparison slider.
- Built-In Maintenance Logs: Once your position is dialled in, Bikerly connects with Strava to monitor component wear on your chain, cassette, and tyres.
You can try your first fit right now at bikerly.app.
3 golden rules when making adjustments
Once your AI fitting report highlights where adjustments are needed, follow these simple rules to avoid overcompensating:
- Change one component at a time: Adjust saddle height first, then fore/aft position, and cockpit reach last. If you move everything simultaneously, you will not know which change helped.
- Move in 3mm to 5mm increments: Never jack your saddle up by 20mm in one go. Even if your fit report suggests a 12mm rise, move it 5mm, do a 20-minute test spin, then make the next adjustment. Give your muscles and tendons time to adapt.
- Mark your baseline: Before loosening any bolts, use a piece of electrical tape or a silver marker to mark your original seatpost height and saddle rail position. If an adjustment feels wrong, you can return to base camp in 10 seconds.
Wrapping up
A great bike fit is not about squeezing out aerodynamic watts for the Tour de France — it is about finishing a 4-hour ride with zero knee pain, feeling fresh, and wanting to jump back on the bike the very next day.
Set your phone up on a chair, take a 15-second video, and see what the AI reveals about your setup.
Have fun tinkering, and happy riding!